|

A beautifully quilted quilt starts with the basics — accurate block sizes, crisply pressed seams,
and straight and squared borders.

 As you begin your quilt, be sure that you are cutting straight accurate pieces and using a scant quarter inch seam in sewing. When you sew three 1 1/2" strips of fabric together lengthwise and press the seams to one side, your piece should measure 3 1/2" wide. If it is narrower than this, your seams are too wide. If the sample piece is wider than 3 1/2", your seams are too skinny. Adjust your seam allowance until your sample piece is on target. As you begin your quilt, be sure that you are cutting straight accurate pieces and using a scant quarter inch seam in sewing. When you sew three 1 1/2" strips of fabric together lengthwise and press the seams to one side, your piece should measure 3 1/2" wide. If it is narrower than this, your seams are too wide. If the sample piece is wider than 3 1/2", your seams are too skinny. Adjust your seam allowance until your sample piece is on target.
You may find it easier to cut some pieces larger than the pattern calls for (e.g., half-square triangles) and trim them to size after sewing and pressing.

Keep in mind that your iron can be one of your greatest assets. In garment making, we were always told to "always press your seams before crossing them with another seam." This adage holds true in the quilting world, too.
The idea is to press your seams, rather than ironing them. A good rule of thumb is to place your sewn unit on the ironing board as it came out of the sewing machine and "setting" the seam by placing the hot iron on top of the seam. This helps to marry the thread used to sew into the layers of fabric it is holding together. Be careful to lift and press, rather than holding the iron down and sliding it across the sewn piece, as this can skew the piece, especially if it is sewn on the bias.
Once you have set your seam, place the piece with the side you want the seam pressed toward on top. (Generally, the seam is pressed toward the dark side. As with many things in quilting, this is a "rule" that is made to be broken, depending on the overall layout and whether or not you are locking your seams.) Gently place the iron on the right side of the bottom layer of fabric and move it over the seam (parallel to the seam) to open up the sewn item. Lift your iron, then place it firmly over the seam area. It is a good idea to flip the piece over and press the seam from the wrong side, too.
Well-pressed seams are easier to lock in place when sewing blocks together. And if you press seams and blocks as you go, you will find it much easier to keep the quilt top pressed flat along the way. And a well-pressed top makes for easier quilting.

When you build a house, the foundation is the most important element. If your foundation is not level, the rest of the building process will be chaos. Squaring up your quilt pieces as you go is a similar concept. If you square up your individual units before sewing into blocks, the blocks will go together nicely. If you square your blocks, then the main part of your quilt top will be uniform. Follow through by squaring your borders as you add them, and you will be right on target for having a squared up top when you are finished.

Ahhhhh…..borders! There are several ways to apply borders to quilt tops. Some work amazingly well; others, not so much. And when your quilt top gets to your long arm quilter, he/she can tell which method you used for applying your borders. We will discuss three methods below, and provide insight into why you may or may not want to use each.

Pattern designers often call for borders to be specific widths and lengths. In a perfect world, this is a great thing! The width is always a good thing to have, but the length may or may not be the same as your quilt top once you get to this point, depending on measuring, cutting, and seam allowances along the way. So if your pattern calls for a 50" border, and your top only measures 48", you have to ease in 2" of border fullness to make it fit the top. This causes "wonky wavy" borders, which are not impossible to quilt, but they really just don't have a lovely appearance in the end. If your pattern calls for a 50" border and your quilt measures 52", then that 2" of fullness gets eased into the main portion of your quilt, which can cause puckering and other not-so-lovely issues during quilting. This is a method I do not recommend, as it often leads to wavy borders.

Your pattern calls for a border 4" wide by 50" long. And you're not really sure how long your quilt top will end up prior to the borders. Perhaps your cutting surface is not long enough to easily measure that 50", so you're just going to cut 4" strips width-of-fabric and sew them together end-to-end to make one really long strip. Then you'll hold it to the top as you sew the two pieces together, and trim the border when you get to the end. And repeat on the other side.
This is another sure fire way to end up with the less-than-lovely "wonky wavy" borders. Why? Because as much as your feed dogs can be your best friend when you really need something to be eased in to fit, they can be your absolutely worst nightmare when it comes to putting borders on. When you are sewing, the feed dogs pull the bottom layer of fabric through your machine faster than the top layer. If the border is on the bottom, then a longer length of border fabric is being sewn to the quilt top — sometimes several inches worth, depending on your machine. Additionally, you can end up with the border on one side being longer than the border on the other side. And your quilt will be skewed, not sqare.

You've likely heard of this method, and perhaps deemed it not worth your time or hassle. For many years, this was me. Trust me, it IS worth your time and the hassle! It is the best method I've found to give your quilt top lovely borders and help you get a squared up quilt in the end.
Start by cutting strips of border fabric the width called for on the pattern (or, if you want to have extra to be able to square your quilt up as you add your borders, add a half-inch extra width). Before cutting the border to length, set them aside and pull out the quilt top. Many suggest measuring along opposite sides and down the middle, then averaging the length and cutting borders to the average length. The idea is that if your top is longer on one side than the other, the average of the three measurements will give you borders of equal length, then you can use your friends the feed dogs to ease whichever side you need to in with the other. Sounds like a lot of work, right? It can be, but it's worth it!

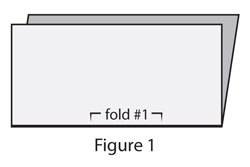
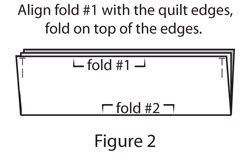
I've come up with my own modification of the "Measure Three Times and Average" method that saves time and effort. I start by folding my quilt top in half (Fig. 1), with the edges I'm going to bind together. Then I fold it in half again in a "hot dog" fold (Fig. 2), so that the fold from the first fold is now laying under the raw edges parallel to them. I have the middle of the top directly beneath the sides. Then I pin through all layers on one end and lay it on a flat surface.
Holding the pinned edge initially with the hand closest to that end, I use my other hand to smooth out the layers in the other direction. As I smooth a section, I move my holding hand to the end of that section so I can keep smoothing down the length of the quilt. I pin the fold and edge layers together on this end, too, and lay it on the work surface.
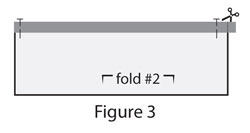
Next, I take two ends of the border fabric and pin them together. Then line up the ends of the border with the pinned end of the quilt top. Pin the border fabric to the quilt top edge (Fig. 3).
Then I repeat the holding and smoothing process as before, this time with the border pieces laying on top the quilt top. If the fold end and two edge ends don't line up perfectly, I visually find the average of their ending points and mark that spot on the border pieces. This is where I cut the border pieces to their proper length.

Whichever way you cut your borders to length, remember pinning is important!! Find the middle of the length of border pieces and pin to mark. Do the same with the edge of the quilt. You want to line up the ends, as well as the middles, of the quilt edge and border pieces. Pin in place. I like to work from the center out and visually find my centers and pin as I work to the ends, using the width of my hands as a guide for how far apart the pins should be placed. The pinning process allows you to evenly distribute the border along the quilt edge. As you are doing so, you can see if you need to offer any "assistance" to either side by intentionally placing that side toward the feed dogs while sewing.

I generally do not backstitch my seams as I am piecing a quilt top, unless there is a place the seam might undergo excess stress on it, causing it to pull out. However, when I start putting borders on, I backstitch at the beginning and end of the border seams to protect them from pulling apart.

Once your borders are in place, take a few minutes to secure the edges of your quilt. This is done by stay stitching around all four edges of your quilt. You may opt to use the same stitch length that you use for piecing, providing you do so within the margin where your binding will ultimately go. Or use a basting stitch if you plan to remove it after quilting.
Securing your quilt with these seams will help to keep it square while quilting. It will also protect the ends of the seams you've used to attach your borders.

Congratulations! Your quilt top is (almost) ready to send to Aerie Designs to be quilted. Please place a safety pin in the center of the top of the quilt top so we can ensure that your top and back are both going in the direction you intended.
Contact us today to reserve your spot on our schedule.
|